| |
What’s Needed:
Windows Automated Installation Kit (WAIK) for Windows
Vista
An x86 or x64 based computer running Windows XP SP2,
Windows Vista, or Windows Server 2003 SP1 operating
system. On this computer you will install the WAIK
and create the sysprep.xml file
A PC with Windows Vista already installed.
A PC to install Windows Vista on (can be the same PC)
A WinPE 2.0 CD or USB Flash Drive
A Windows Server 2003 Domain environment
Assumptions
These instructions
are based on the Ultimate or Business versions of Vista
<enter> means press the Enter key
You know how to open an elevated
command prompt in
Vista
You have a basic understanding of ImageX and the WAIK
You have a basic understanding of DOS
Basic Steps
• Install and configure Windows Vista along with
any needed applications on a reference PC.
• Using the WAIK and WSIM, create a Sysprep.xml
file that will automate the configuration of Windows
Vista.
• Copy the Sysprep.xml file to the reference
PC.
• Run Sysprep.exe on the reference PC
to "prep" the Vista installation for imaging.
• Boot the sysprepped PC with a WinPE CD or
UFD and capture an image of the hard drive.
• Save the image to a network share (or removable
media).
• Apply the saved image to other PCs.
• On first boot up of the newly imaged PCs, mini-setup,
using sysprep.xml, will run and auto-configure Windows
Vista.
• Login and use the PC.
Overview 
1. Create
a WinPE 2.0 CD or USB Flash Drive (UFD).
WinPE 2.0 can be used to boot up a PC, and either capture
an image of that PC or apply an already created image
to the PC. You will need a WinPE 2.0 CD or UFD to complete
these instructions.
2. Install
Windows Vista on a reference PC.
Use the Windows System Image Manager (WSIM) to
create an
autounattend.xml configuration file, that
when used with a Windows Vista DVD or UFD, can automate
the setup of your reference PC - Run
an unattended install of Windows Vista. You don't have to
run an automated setup of Vista on the reference PC.
You can manually install it using the DVD.
Note: These instructions assume
a Clean
Install of Vista. Not only would I
not recommend
an in place upgrade of any Windows operating system
from a previous version (there are just too many
problems that can occur when doing this), Sysprep
is meant to be used only with clean installs.
3. Configure the reference PC, then using Sysprep.exe,
prepare the PC for Imaging.
4. Create an Image of the reference
PC. Boot the Sysprepped
reference PC with the WinPE CD or UFD, create an image
of the PC using ImageX, and save the image to a Windows
2003 server.
5. Apply that image to a new PC or PCs.
Configuring the Reference PC
Hopefully, you have standards
in place for hardware
and software in your current computing environment.
The more homogenous your desktop environment is, the
easier it is to deploy PCs and maintain PCs. If you
are in an environment where there is a hodge-podge
of hardware and software, (that end users can configure
anyway they want) you need to create some standards,
and stick to them. Assuming then, you have established
a standardized desktop platform, you will need to
create a reference PC that will be the basis of your
desktop deployment. Of course, if you are a larger
company with different groups, each with different
computing needs, you might have multiple standardized
computing platforms. If this is the case, you might
have more than one reference PC to build.
Once you have Windows Vista installed on your reference
PC, you will need to configure it. This PC will be
the basis of the image that is applied to your end
user PCs. How you configure
you reference PC(s) will be predicated on your standards
and particular computing environment. Below are some
suggestions for configuring the Windows
Vista operating system settings on your reference PC
.
• Get and install the latest
BIOS
• In addition to the latest BIOS, get and install
any Windows Vista OEM updates (updates your PC manufacturer
recommends)
• Run Windows Update
• Update hardware drivers (if needed)
• Configure Windows Explorer settings
• Configure Internet Explorer
settings
• Configure Desktop settings
• Configure Start
Menu settings
• Configure Task bar
settings
• Configure Windows
Sidebar settings (if you want to use this)
• Add anything you want to run at login to the startup
folder used for all users
(ex.
a shortcut to Task Manager)
• Check/Configure
System
settings (Device Manager, Paging file, DEP,
Restore Points, Remote Access, Performance settings,
Hibernation file (do you want this?), Time Zone and
Time and Power Settings)
Additional Configuration Settings
Default Profile - If you want all
of the users who login to a PC to start out with
the same profile, which makes sense for standardization
of your computing environment, then do the following:
• Rename the current C:\Users\Default folder to Default.orig
(or what ever name is meaningful to you. It will be the
original Default profile folder. You don't have to do
this, but it is good to have a backup of the original
folder if you need it.
• Under the C:\Users folder, create a new folder
call Default. This will become the new Default profile
folder. In the Sysprep.xml file, (see below) you will
set the CopyProfile setting to True under the
Microsoft-Windows-Shell-Setup_neutral
component in Pass 4. What this setting will do is copy
the profile of the logged in user, when Sysprep is run,
to the C:\Users\Default folder. Now, all users who login
will start out with the same profile. Each new user who
logs into the PC has a profile created for them. It is
built from a combination of the Default profile and what
used to be called the All Users profile (which is now
a combination of the Public profile and certain data pulled
from the C:\ProgramData folder).
• When configuring a PC for imaging, I like to login to the PC as a member
of the Domain Admins group, configure the PC and install any apps. This gives
me administrative access to the PC, and also provides a user profile/login that
can be used when
setting up other PCs using this PC's image. You will probably have to change
the computer name of each of your imaged PCs, and this login/profile
has the rights to do this. (See additional notes at the bottom)
SetupComplete.cmd - this batch file
is run after Windows is installed, but before the logon
screen appears. Windows Setup searches for the SetupComplete.cmd
file in the C:\Windows\Setup\Scripts folder. If a SetupComplete.cmd
file is found, the file is executed.
For example, I created a SetupComplete.cmd file
in the
C:\Windows\Setup\Scripts folder to modify some registry
settings, and I put the .reg file that SetupComplete
calls, in the C:\Windows\Setup folder. When
Vista is being installed, but just before first login,
the SetupComplete.cmd file is run and the registry settings
are modified. Click here to see these files.
You can use SetupComplete.cmd to copy files to the PC,
run scripts, modify registry settings and so on. For
more information about SetupComplete.cmd click
here.
Note:
You do not
see SetupComplete.cmd run or have interaction with it,
so be sure any commands you do use in the SetupComplete.cmd
file are accurate and won't error out on you.
Once you have the above done, but
before you install any application software, you might
want to sysprep this PC and capture an image of the
PC as it is now. This will provide a clean Vista PC
image with the operating system configured. If you should
have problems when installing applications, while configuring
your reference PC, you can always apply this clean OS
image to your reference PC. It will save you from having
to reconfigure the OS all over again. Additionally,
if you have multiple images to create, and limited hardware
to test with, you can use this base image as a starting
point for your different images.
You can now install, configure and test any applications that
will be needed by your end users. Be sure you test the PC before imaging. If
your end users will not be a member of the local administrators group, then login
and test the PC as a user who is not a member of the local administrators group.
You don't want to deploy an image to 10s or hundreds of PCs just to find an application
doesn't work properly.
Creating
the Sysprep.xml file
You
now need to create the sysprep.xml file
that will instruct Windows Vista how to configure
itself on first boot up after the image is applied
to a PC. Sysprep.xml will automate answering the
questions Windows Vista normally asks when you install
it - Computer name, product key, creating a local
user account, time zone and so on.
The sysprep.xml file can be named anything you want
(with an .xml extension). I am just choosing to use
sysprepdomain.xml. Sysprep.xml is created using the
Windows System Image Manager (WSIM). WSIM is part
of the Windows Automated Installation Kit for Windows
Vista (WAIK). If you need to know how to use WSIM,
see this article on Automated
Installs of Windows Vista. WSIM is used to
create both the sysprep.xml file used when prepping
a hard drive for imaging, as well as the autounattend.xml
file used in an automated Vista install.
Below are the components and their settings used in
this example sysprepdomain.xml file. To see the actual
sysprepdomain.xml file, click
here.
| Task |
Component -Preferred Pass |
SkipRearm=1
This will allow you to reset Activation
up to 8 times. This is useful if you will
be testing Sysprep multiple times.
If you set SkipRearm=0, or leave out the component,
Activation will be reset, or rearmed to 30 days.
However, you can only rearm/reset activation 3
times.
|
Microsoft-Windows-Licensing-Security-SLC_neutral
- 3
|
• Run a command to enable the local Administrator
account (this is optional).
Right click the Components heading, choose Insert Synchronous Command to Pass
4 - Specialize. Type the following into the Path field:
net user administrator /active:yes
Then set Order=1, if is not set.
|
Microsoft-Windows-Deployment_neutral - 4
|
• Tell Vista to skip Auto Activation (you
have plenty
of time after the install to activate). There is only one setting here: SkipAutoActivation=True
|
Microsoft-Windows-Security-Licensing-SLC-UX_neutral
- 4
|
• ComputerName (use an asterisk
* here,
and see the Additional notes below.)
• CopyProfile=true (this will copy
the logged in user's profile to the default profile
if you want to set a default profile for every user who logs in)
• Enter Product Key (optional - the product
key determines what version of Vista you are installing.
ex. You can't install Vista Ultimate with a Vista
Business product key.)
• RegisteredOrganization=Microsoft (do not change this)
• RegisteredOwner=AutoBVT (do not change this)
• ShowWindowsLive=false (this will not show a Windows Live link on the start
menu)
• Time zone (right click, choose Help to see the Time Zone names. ex. Eastern
Standard Time or Pacific Standard Time)
• Configure your Display settings using
the Display sub component (optional).
|
Microsoft-Windows-Shell-Setup_neutral - 4
|
• This component joins the PC to a Windows domain
• In the Identification sub component, configure these settings:
DebugJoin=false
DebugJoinOnlyOnThisError=0
JoinDomain=your domain name
UnsecureJoin=false
• In the Credentials sub component enter the user name and password of a
member of the Domain Admins group or Account Operators group so the PC can be
added to the domain. Enter the name of the domain to join.
|
Microsoft-Windows-UnattendedJoin_neutral - 4
|
Set the language used
for the install
InputLocal=en-us
SystemLocal=en-us
UILanguage=en-us
UserLocal=en-us
|
Microsoft-Windows-International-Core_neutral
- 7
|
| • RegisteredOrganization=Your
Company Name
• RegisteredOwner=Your Company Name
OOBE sub component:
• HideEULAPage=true (Skip the EULA)
• NetworkLocation=Work
• ProtectYourPC=1, 2 or 3 (using 3 will disable automatic updates)
• SkipUserOOBE=true (Skip the annoying Windows Welcome Screen)
UserAccounts sub component:
• AdministratorPassword sub component - this sets the password for
the local administrator account we enabled above. Putting it here encrypts the
password.
• In the LocalAccounts sub component, create a local
user account and password that you can login with when the install is finished. (note:
this is
required even if you are joining the PC to a domain).
(note: OOBE stands for Out Of Box Experience)
|
Microsoft-Windows-Shell-Setup_neutral - 7
|
Below is what the complete list of components
will look like in WSIM . You will notice
that only 3 of 7 possible passes were used for the
components. This is to be expected. Passes
are different phases of the Windows Vista installation.
Some components will have more than one pass to choose
from, some can only go in one pass, and some components
will be in more than one pass. It all depends on
how and when Vista processes the various components
during the install.
Note: Pass
1, windowsPE is not used with
Sysprep. If you enter
any Pass 1 components, they will be ignored.
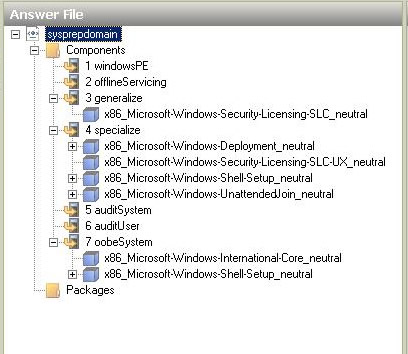
Sysprepdomain.xml in WSIM with all the components
added and expanded.

Running
Sysprep
Copy Sysprepdomain.xml to your reference
PC -
In previous versions of Windows, Sysprep.exe was an
add on program. In Windows Vista, it comes with the
operating system. Sysprep.exe can be found in C:\windows\system32\sysprep\sysprep.exe.
You will need administrative access to view/use this
folder.
Copy sysprepdomain.xml to
the C:\windows\system32\sysprep folder.
Once copied, you are almost ready to run sysprep on the
reference PC. Before you run sysprep to prepare
the PC for imaging, you need to
clean up the PC. While
configuring the test PC and installing applications /
files / drivers, etc., you have probably created some
garbage that needs to be deleted.
Use the following as a guideline when cleaning up the
PC:
• Run "Delete All" in
Internet Explorer > Internet Options to clear out temp
files, cookies, etc.
• Delete
any user profiles you don't need (extra ones you
might have created after the install)
• Delete any .zip or .exe program / driver files you might have copied to
the PC, to install, and no longer need.
• Delete any extra folders you might have created during testing and don't
need
• Uninstall any utility apps you might have used for testing and don't need in
the final image
• Run Disk Cleanup (click start, type clean in the
search box, click on Disk Cleanup. Make sure you choose
to cleanup "Files from All users".)
Sysprep does do some of its own
clean up too. These are the
things Sysprep will delete/remove:
• Deletes event logs
• Deletes restore points
• Disables the local Administrator account and deletes its profile
• Removes any SID information from the PC
• Removes any Plug and Play device drivers that were installed during initial
installation of Vista
(these will automatically be re-discovered when the PC next boots up)
• If the Test PC is a member of a domain, Sysprep will automatically remove
it and make it a member of "Workgroup".
Once you have cleaned up your reference PC, it
is time to run Sysprep. Sysprep takes
less than a minute to run. All you do is
open an Administrative command prompt, change directory
to
C:\Windows\System32\Sysprep
and type:
sysprep /generalize /oobe
/shutdown /unattend:sysprepdomain.xml
The /unattend switch uses the sysprep configuration
file you created in WSIM.
The /generalize switch cleans up the PC - mentioned
above.
The /oobe switch says to start the computer in Windows
Welcome mode the next time it is booted up. The settings
in your sysprep.xml file will be used to answer the
questions that are normally entered manually during
Windows Welcome.
The /shutdown switch shuts down the PC once Sysprep
has run.
Note: Sysprep in Vista can be run
with a GUI
interface. Although
generally, you would not do this, if you type just sysprep.exe
with no switches at the command line, it will open a
GUI version of Sysprep where you can check options for
Sysprep.
Capturing
and Applying a reference image
Capturing an Image
Now that you have configured your reference PC and
ran sysprep.exe on it, you are ready to capture
an image of the PC and store it on a network
server. Once you have an image of the reference PC,
you can use it to setup all your other PCs.
Get your WinPE
2.0 USB flash drive or CD and boot your
reference PC with it. This will boot the PC into Windows
PE. Once in Windows PE you will use ImageX to capture
an image of the PC. Using ImageX to capture an image
is very easy.
Since we are assuming that you are using a Windows
2003 (or Win2000) domain, you are going to save your
reference image to a server in your domain. Once the
image is on a domain server, you can use your WinPE
USB flash drive (or CD) and boot up any PC, map a drive
to the server, and apply the saved image to the PC.
First map a drive to the server you will
be saving the image to. For example:
net use * \\server1\installs\vistaimages
/user:mydomain\installman (you will be
prompted for a password)
Now use ImageX to capture an image of the PC and save
it to the server:
imagex /capture /compress
maximum /check c: z:\ult32domain.wim "Ultimate32
Domain"
/capture - tells imagex it will be capturing an image
(as opposed to applying an image)
/compress maximum - tells imagex to use maximum compression
on the image
/check - tell imagex to check the integrity of the
image file
c: - is the drive we are imaging
z:\ult32domain.wim - is
the destination folder (your mapped drive) and image
file name you are creating on the server
"Ultimate32 Domain" -
is a descriptive name for the image
Note: While imagex is creating
the image file, you can look in the shared folder on
the server and see the image being saved there.
Applying an Image
Once you have captured/created an image file and saved
it to a domain server, it can be used to image other
PCs in your organization. Applying
an ImageX image file is very similar to capturing
one.
Use your WinPE USB flash drive (or CD) and
boot up the target PC, map a drive to the server, and
apply the saved image to the PC.
First map a drive to the server you will be applying the image from. For example:
net use * \\server1\installs\vistaimages
/user:mydomain\installman (you will be
prompted for a password)
Before you apply an image, you need to prepare the
hard drive. ImageX does not partition or format a drive
when applying an image. It simply lays down the contents
of the image file on the hard drive. Therefore, you
should either format the drive you are applying the
image to, or if necessary, partition it, then format
it.
If you already have your hard drive partitioned the
way you want, just run a quick format on the destination
drive first.
format c: /fs:ntfs
/q/y (if the drive is already
formatted as NTFS, you can leave off the /fs switch)
Now
use ImageX to apply an image to the PC:
imagex /apply z:\ult32domain.wim
1 c:
If you need to partition the hard drive first, use
Diskpart to create the partition and format it. The
following are the Diskpart commands you run one at
a time. Press <enter> after each command.
• Diskpart
• List disk
(this command is important. It will show you what disk drives you have.
Most likely your hard drive will be will be Disk 0, but you need to check it
first.)
• select disk 0
• clean
• create partition primary size=60000
(this creates a partition 60GB in size.
If you want to use the whole hard drive, just leave off the size=number)
• select partition 1
• active
• format fs=ntfs quick
• assign letter=c
• exit
Now use ImageX to apply an image to the PC:
imagex /apply z:\ult32domain.wim
1 c:
z:\ult32domain.wim - is the location folder (your
mapped drive) and image file name you are applying
z:\ult32domain.wim 1 - the
number 1 here is the index number of the image you
want to work with. The index number in required. Wim
files can contain more than one image, and the index
number indicates what image you want to work with.
Since your image files will probably contain only
1 image, use the number 1.
c: - is the drive we are applying the image to.
Once the image is applied, type wpeutil
reboot at the WinPE command prompt to reboot
the PC.
Or type wpeutil shutdown at the command prompt
to shutdown the PC.
Additional
Notes about Sysprep and ImageX
• Sysprep.exe is located in the C:\windows\system32\sysprep
directory on all Vista installations. Sysprep must
always be run from the C:\windows\system32\sysprep
directory, and must run on the version of Windows with
which it was installed.
• You must apply your Sysprepped image to the same
volume it was captured from. So if you captured an image
from drive C:, you must apply the image to drive C:.
• Do not encrypt any files or folders
on your reference PC that you will be running Sysprep
on. If you run Sysprep on an NTFS file system partition
that contains encrypted files or folders, the data in
those folders becomes completely unreadable and unrecoverable.
• How much time does it take to capture and apply images?
As an example, when I imaged a fully configured Vista PC with a few applications
(no giant Office Suite type apps), it took about 50 minutes to
capture and save the image to the file server using the steps outlined above.
The final image size was about 2.5GB in size. It took a little less than 6 minutes to
apply the image from the file server. This was using a 100Mb full duplex network
connection with a new dual core AMD processor based PC. You might be able to
cut down on the capture time by not using /compress maximum, but then your image
file will be bigger.
• In the above sysprepdomain.xml file you had to enter a Computer
Name. I suggested you use an asterisk instead of an actual computer
name. In past versions of sysprep, if you left the computer name out of the sysprep
configuration file, the install would stop and prompt you for a name. This is
typically the way multiple Windows computers were/are setup because each Windows
computer needs a unique name. In Windows Vista, there is a bug. If you leave
out the computer name, sysprep will generate a random computer name and not stop
to prompt you for one. Not only does it not prompt you, but when you try to login
to a domain after the PC finishes setup, it will generate an error message. "The
trust relationship between this workstation and the primary domain failed".
So far there is no fix for this, however; if you use an asterisk ( * ) for the
computer name, it still generates a random name, but there is no error message
about the trust relationship. Once the the install finishes, you can simply login
to the PC with a user account that has rights to change the computer name (Domain
Admins or Account Operators) and rename the computer to its proper name. Not
ideal, but until Microsoft fixes this, it is probably the simplest way to address
the problem.
• Location of Sysprep logs:
C:\windows\system32\sysprep\panther\setupact.log
generalize - C:\windows\system32\sysprep\panther\setupact.log
specialize - C:\windows\panther\setupact.log
Unattended Windows setup actions - C:\windows\panther\unattendgc
|
|

