| Creating
a WinPE 2.0 CD and USB Flash Drive
What’s Needed:
Windows Automated Installation Kit (WAIK) for Windows
Vista
An x86- or x64-based computer running Windows XP SP2,
Windows Vista, or Windows Server 2003 SP1 operating
system. This computer will be called the “Technician
PC”.
A CD or DVD drive that can create (burn) bootable CD
or DVD media.
Image-burning software to create bootable CD or DVD
media.
A USB Flash Drive (if you want to install it on a UFD)
Assumptions
<enter> means press the Enter key
You know how to open an elevated
command prompt in
Vista
You have a basic understanding of ImageX and the WAIK
You have a basic understanding of DOS
1. Install
the Windows Automated Installation Kit on
the Technician PC. A little bit of a pain if you
don't have this installed. You have to download an
image of the WAIK from MS, create a DVD from the image
(the same as creating a DVD from an ISO file), then
install it from the DVD. You can download the WAIK
for Windows Vista here.
2. Once the WAIK
is installed, click Start > Programs > Microsoft
Windows AIK and choose the Windows PE Tools command
prompt entry. (if you are doing this on a Windows Vista
PC, right click the Windows PE Tools command prompt
entry and choose Run as administrator).
3. You are now going
to run a command that will create the directory structure
and files needed to create the WinPE CD. The command
will be different depending on the hardware platform
you will be using WinPE on.
• x86 is for Intel and AMD
32 bit processors
(note: I used an x86 build on an
AMD 64 bit dual core X2 processor based PC, and it
worked fine. This could be due to x64 and AMD64, which
are nearly identical, being
a superset of x86 and are backward compatible with x86.)
• amd64 is for Intel and AMD 64 bit processors.
• ia64 is for
Itanium processors.
In the Windows PE Tools command
prompt window type:
copype <arch> <destination>
Where <arch> can
be x86, amd64, or ia64 and <destination> is
a path to a local directory.
For example,
copype x86 c:\winpe <enter>
(Note: the destination directory can be whatever you
want.)
The script creates the following directory structure
and copies all the necessary files for you to create
your WinPE 2.0 CD.
\winpe
\winpe\ISO
\winpe\mount
c:\winpe - contains ETFSBoot.com, the WinPE bootstrap
loader, and winpe.wim, a Windows image file that
has all the files for a basic WinPE.
c:\winpe\ISO - contains the files needed to create
the WinPE ISO file that will be burned to CD.
c:\winpe\mount - this is an empty folder that will
be used to modify the winpe.wim image file.
4. You could now create your WinPE CD, but what
if you want to add something to WinPE before you make
your CD? You can do this by using some tools that come
with the WAIK.
Look in the c:\winpe folder, you will see a file called
winpe.wim. The winpe.wim file is a new type of file
called a Windows Image file. Winpe.wim is WinPE in
a compressed image file. In order to make changes to
the image file, you need to use a program that comes
with the WAIK called ImageX. Imagex is a new Windows
command line tool used to manipulate Windows image
files (.wim files). Type the following in your Windows
PE Tools command prompt window:
imagex /mountrw c:\winpe\winpe.wim
1 c:\winpe\mount <enter>
This will “mount” the winpe.wim file in
the mount folder that was created earlier. You will
notice a simple Windows directory structure in the
mount folder. Once the image is mounted, you can add,
change or remove files in the directory structure like
you would any other files in Windows.
imagex /mountrw – mounts a .wim file with read/write
permissions so you can edit the image.
c:\winpe\winpe.wim 1 - the number 1 is the index number
of the image you want to work with. The index number
in required. Wim files can contain more than one image,
and the index number indicates what image you want
to work with. Winpe.wim has only one image, but if
you want to see what images are in a given .wim file
use the imagex /info command:
imagex /info c:\winpe\winpe.wim (you must unmount
the image file first)
Now that we have our WinPE image file mounted let’s
add some functionality to WinPE. You can add Packages
that add functionality to WinPE. Adding a package is
optional, but if you want to see the packages that
are available to load, type the following:
peimg /list /image=c:\winpe\mount
The Packages will be listed, with a minus sign to
the left of the package name.
We are going to add 2 Packages to the Windows directory
in the WinPE image. Type the following:
peimg /install=*HTA* c:\winpe\mount\windows <enter>
peimg /install=*XML* c:\winpe\mount\windows <enter>
Now type: peimg /list /image=c:\winpe\mount
You
will see a + sign next to the WinPE HTA and XML packages.
We are going to add two more things to the WinPE Image.
1.
ImageX.
ImageX, which is needed if you
are going to be capturing or applying images of Windows
Vista using WinPE, is not included in the WinPE Image.
To add ImageX to your WinPE CD type the following:
copy C:\WAIK\tools\x86\imagex.exe
c:\winpe\mount\windows\system32 <enter>
(use the path to wherever you installed the WAIK)
2. The second thing we will add is an .ini file called wimscript.ini.
This file is used by ImageX to exclude unneeded files
and folders when capturing an image of a Vista PC.
ImageX will, by default, exclude certain files, but
if it finds a wimscript.ini file in the same folder
as ImageX, it will use this file for any additional
exclusions.
Microsoft recommends the following wimscript.ini file.
Click
Here for an example.
Copy the wimscript.ini file to c:\winpe\mount\windows\system32.
5. We have so far,
created the directory structure to create the WinPE
CD, mounted the Winpe.wim image file, and added some
files/functionality to the WinPE image. We are now
ready to save the changes we have made to the winpe.wim
image file. To do this, you need to unmount and commit
the changes. Type the following:
imagex.exe /unmount /commit
c:\winpe\mount <enter>
(Note: If you leave off the /commit switch, the changes
you have made will not be saved.)
6. If you look
in the c:\winpe\ISO\sources directory
there is a single file named
boot.wim. We have to replace
the default boot.wim in the sources directory with
the new custom winpe.wim image we created. The image
file must be called boot.wim, so we need to copy our
winpe.wim to boot.wim. Do this by typing:
copy c:\winpe\winpe.wim
c:\winpe\iso\sources\boot.wim /y <enter>
7. To
create the .iso file that you burn your WinPE CD
from, you use the Oscdimg command line program that
comes with the WAIK. Type the following:
oscdimg -n -h -bc:\winpe\etfsboot.com
c:\winpe\iso c:\winpe\winpe.iso <enter>
Oscdimg tells etfsboot.com to look in the c:\winpe\iso
folder for a file named boot.wim, and convert the boot.wim
to an ISO file named winpe.iso, and put it in the c:\winpe
folder. The -n option allows for long file names and
the -b option makes it bootable, and -h says to write
any hidden files or folders. (Note: there is no space
between bc)
If you are creating a bootable ISO for a ia64 architecture,
replace etfsboot.com with efisys.bin.
Now that you have an .iso
file, winpe.iso, all
you have to do is burn a CD/DVD from the winpe.iso
file and you will have a bootable WinPE 2.0 CD/DVD.
8. Instead of a creating a bootable CD, you can also
create a bootable UFD (USB Flash
Drive). To do this,
do the following:
Place a USB flash drive in a USB port on
a Windows Vista PC.
(a 1GB flash drive is more
than big enough).
Delete any files on the USB drive.
Partition and format the USB flash drive using Diskpart
(next).
Note: According to the Windows PE documentation,
the following Diskpart commands must be done on a
Windows Vista PC. This is because Windows Vista Diskpart.exe
has the ability to see and use USB flash drives. Earlier
version of Diskpart do not.
(see Additional Notes below)
This set of commands assumes your USB flash drive is
detected as disk 1. You should double check this by
listing the disks before cleaning the USB drive. Open
a command prompt window and type the following commands,
pressing <enter> after each command.
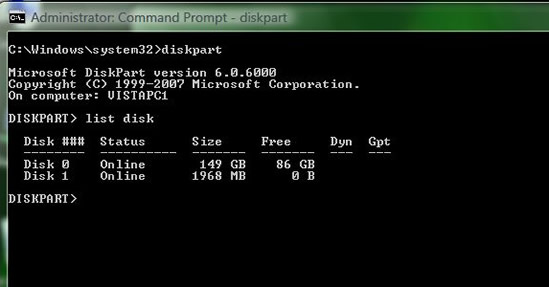
• Diskpart
• List disk
(this command is important. It will show you what disk
your USB Flash Drive is. Most likely it will be Disk
1. You don’t want to format your C: drive !)
• select
disk 1
• clean
• create partition primary
• select partition 1
• active
• format fs=fat32
• assign
• exit
You will now have a partitioned and formatted USB flash
drive. All that is needed to create a bootable USB
WinPE 2.0 flash drive is to copy the Winpe\ISO folders
and files onto the USB flash drive. Insert
the USB flash drive into a USB port on the Technician
PC - that you have the c:\winpe directory structure
on, open a command prompt
window, and run the following command to copy
the contents to the USB flash drive:
xcopy c:\winpe\iso\*.*
f:\ /e/h/f <enter>
change f:\ to reflect your USB flash drive.
That's it. You now have a bootable USB WinPE
2.0 flash drive.
Note: You will have to set your PC BIOS to boot
from a USB device in order to boot from the WinPE
USB Flash Drive.
What can you do with WinPE? 
When you boot up WinPE 2.0, it will look like the
image below. Windows PE boots entirely into memory,
and runs in memory. You can remove your CD or Flash
Drive after it is booted up and WinPE will continue
to work just fine.
When it does boot up, WinPE first runs x:\windows\system32\startnet.cmd
which is just a batch file with one line in it - wpeinit.exe.
When Windows PE starts, Winpeshl.exe executes
Startnet.cmd, which launches Wpeinit.exe. Wpeinit.exe
installs PnP devices, processes Unattend.xml
settings, and loads network resources (tries to
obtain a DHCP IP address). When it finishes, you will
see the command prompt window below. There is no GUI
in WinPE, no Start button, no Control Panel and so
on. Most of what you will do in WinPE will be done
from the command line.
Using Windows PE 2.0 you can do the following:
• Capture an image of a hard drive, using ImageX,
and save that image to removable media or a network
share.
• Apply an image, using ImageX, from removable
media or a network share.
• Start an unattended installation of Windows
XP, Vista or Win2003 Server.
• Copy files to and from the local hard drive,
which can be useful for troubleshooting/fixing problems.
NTFS partitions are recognized by WinPE so that is
not an issue.
• Run DOS batch files and VBscript files to automate
whatever tasks you need to do.
• Use the included Diskpart utility to partition
and format hard drives. You can even extend and shrink
existing partitions.
• There are some very basic applications available in WinPE. Regedit, Diskpart,
Netcfg, Netsh, Task Manager, Notepad and others. They can be found in the x:\windows\system32
directory. Keep in mind, WinPE is not a full implementation of a Windows OS,
so you can't run just any Windows application in the WinPE environment, and .Net
applications are currently not supported.

Additional
Notes about Windows PE
• WinPE 2.0 uses less than 200MB on a CD/DVD,
USB flash drive.
• The computer you will be booting up with the
WinPE 2.0 CD/UFD should have a minimum of 256MB of memory,
but 512MB of memory would probably be the real world
minimum you should have.
• WinPE 2.0 will automatically reboot itself after 72 hours of use.
• The WAIK for Vista documention mentions a Windows Recovery Environment
package for WinPE 2.0. This is actually not available. MS removed this before
releasing the WAIK (version 1.x).
• WinPE use the X: drive for it's RAM drive, drive letter. Don't let this
throw you. You can change drives just like you would in DOS by typing the drive
letter at the command prompt
(x:\>c: <enter>). You can access local HDDs, CD/DVD
drives, Floppy drives and USB drives.
• WinPE 2.0, although built from Windows Vista, can be used to install previous
Windows operating systems and can be used to access files and folders on previous
Windows operating Systems.
• When you boot from a WinPE 2.0 USB flash drive, your PC will not
prompt you to boot from the flash drive (like it will do when booting from a CD or
DVD). It just boots right into WinPE.
• Also, if you don't want to be prompted to boot from the WinPE 2.0 CD or
DVD, delete the bootfix.bin file from the \ISO\boot folder before creating
your WinPE 2.0 CD/DVD.
• Use wpeutil reboot at the command prompt
to reboot the PC running WinPE 2.0
• Use wpeutil shutdown at the command
prompt to shutdown the PC running WinPE 2.0
• If your network does not use DHCP, you can
use static IP addressing. You can also use
net use to map drives to other networked computers.
For example:
netsh int ip set address
local static 10.80.10.35 255.255.255.0 10.80.10.1 <enter>
net use * \\appsrv1\apps
/user:mydomain\jdoe <enter>
This will set a static IP address (use ipconfig to
see it) and then map a drive to the apps share on
the appsrv1 server (you will be
prompted for a network password).
• The WAIK for Vista documentation says you
have to run Diskpart on a Vista PC if you
are going to be making a WinPE bootable UFD.
In typical Windows documentation fashion, it
doesn't say why. This demand seemed
a little odd. Why
do you Have to
do it on a Vista PC?
I put my USB flash drive in a USB port
on a Win2003 SP1 32bit server. Opened a command
prompt and ran Diskpart. I then ran the Diskpart
command "list disk". It only showed
my local HDD, not the USB drive. My USB drive
was visible/accessible in Windows Explorer.
I then copied Diskpart.exe from a Vista Ultimate
32bit PC to the Win2003 server and ran it. I
received an error message: "This is not a valid
Win32 application", then "access is denied". I
checked the permissions, and the logged on user had
full permissions to the Vista Diskpart.exe.
I then put the same USB flash drive on the Vista Ultimate
32bit PC and ran Diskpart.exe. Sure enough, the
USB drive was now listed when the "list disk" command
was run in Diskpart.
I can only conclude that Windows Vista Diskpart.exe
has the ability to see and use/configure USB flash
drives. Earlier version of Diskpart do not.
|

