Introduction

The following are the procedures to follow for an unattended
install of Windows XP Pro with
Office XP Professional from a Windows 2000 Server. There
are various ways to script an unattended install of a Microsoft
operating system, and this is just one possible installation scenario.
If you are looking to implement an unattended install of Windows
XP, this document will get you started. The various steps can
be modified to suit your environment.
Note: Although this document discusses Windows XP and Office
XP, the same procedures can be followed for Windows 2000 and Office
2000.
Terms
| Installation
Point(s) |
The folder(s) on a Windows 2000 server
that house the Windows XP operating system files and/or the
Office XP files. Also called Distribution Points. |
| Source Server |
The server that houses the files
necessary for the installation. The installation point(s) will
be on the source server. |
| Target PC |
The PC that you will be installing
Windows XP and Office XP on. |
| Unattended Install |
The automated installation and configuration
of an operating system and applications using a script to answer
installation questions. Ideally, no user intervention
or input should be needed once the installation starts. |
Assumptions
It is assumed you have some experience with unattended installs,
DOS batch files, Office XP installations, Windows XP and a general
understanding of networking and PC installs. This document does
not attempt to go into every detail about Windows and Office installations.
Description of the Target PC
The target PC in this installation is fully Windows XP compliant.
Ideally, Windows XP will have all the drivers necessary for
the hardware on your PC(s). Since XP is a relatively new operating
system, this should not be a problem, unless you are using bleeding
edge hardware. If this is the case, and you do have to add
drivers, this is a fairly simple process. And though I will
not be covering that topic in this document, you can find the information
on how to do this in the Windows 2000 unattend.doc
file (it is the same for Windows XP) or in the Windows XP
deployment help files. Additionally, the following MS
Knowledgebase article describes the process:
http://support.microsoft.com/default.aspx?scid=kb;en-us;Q254078
| Make/Model |
Dell Dimension 4100 |
| Processor |
Pentium lll - 1.0GHz |
| Memory |
256MB of PC133 SDRAM |
| Hard Drive |
20GB ATA 100 hard drive
connected to the onboard hard drive Controller. |
| Network Card |
3COM 3c905TX running at 100 Mbps/Full
duplex, connected to a 3COM 10/100 autosensing switch over CAT5
UTP cable. |
| Sound Card |
Sound Blaster Live Value |
| Video Card |
ATI Rage 128 Pro AGP 4x |
| Monitor |
17" Plug and Play CRT - Dell
branded monitor |
| Peripherals |
1.44MB Floppy drive, Samsung 24x
CD ROM Drive |
Basic Procedures
The basic procedures for this installation are as follows. All steps
will be automated (except for
creating the Installation Points). In this installation, the
installer will only have 2 things to do:
Put the boot disk in the target PC, reboot the PC.
Enter the name of the computer during the XP Pro install.
| 1. |
Create Installation
Points for Windows XP Pro and Office XP on a Windows 2000 server. |
| 2. |
Create
an unattend.txt file that will be the script file for the unattended
install. |
| 3. |
Create a Network
boot disk that will boot up the target PC, connect to and
login to a Windows 2000 Domain, map a drive to a share on the
source server and start the unattended installation. |
| 4. |
Prepare
the target PC by deleting the partitions on the target PC's
hard drive and create a FAT16, 2GB partition. This will be the
C: drive. |
| 5. |
Once the hard drive has been partitioned
and formatted as FAT16, reboot the PC, reconnect to the source
server and start installing Windows XP Pro. |
| 6. |
The
XP installation will start, files will be copied, the hard
drive will be formatted as NTFS, and the boot/system partition
(C: drive) will be increased from 2GB to 6GB. |
| 7. |
During the XP Pro install, you will
be prompted for a computer name. Enter a unique computer name.
When the install finishes, the PC will reboot and the local
Administrator will automatically log in. |
| 8. |
Once
the Administrator logs in, a batch file will kick off that
will do the following:
- Modify some registry settings on the target PC.
- Copy the Windows XP I386 directory from the source server
to the C:\I386 directory on the target PC.
- Create and format as NTFS, a second partition which will be
the E: drive. The C: drive will be the boot/system partition,
and D: will be the CD ROM drive.
- Install Office XP on the E: drive under E:\Program Files.
- Delete the Default User profile and copy a preconfigured Default
User profile to the target PC.
- Do a silent install of Recovery Console.
- Reboot the PC for a final time. User logs in. |
Creating
the Installation Points
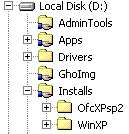
On your Windows 2000 server create a folder called Installs.
This should be at the root of a drive.
In this example it will be the D: drive. Under Installs create the
following folders:
OfcXPsp2
WinXP
Next, on the Windows 2000 server/domain, create a user named Installman.
This will be the username that is used to login to the domain
and do the unattended install. Share the Installs folder. Give
Authenticated Users Full Control Share Permissions. For
the NTFS Permissions, give Administrators Full Control and for Installman
give Read&Execute, List Folder Contents and Read. No other
users need to be added to the permissions list.
Note: How you set up user and group access will depend on your
Domain standards.
The important thing is to give only the minimum permissions necessary.
Windows XP Pro Installation Point
To create the Windows XP Installation Point, simply copy the contents
of your XP Pro CD to the D:\Installs\Winxp folder. This will
create the installation point. Next, you should slipstream the
latest service pack into the Winxp folder so you have an integrated
install of Windows XP SPx. For instructions on slipstreaming
see this page
 . .
Note: You could just copy the I386 folder from the CD to \Winxp,
but then you wouldn't be able to slipstream service packs into your
XP installation point.
Office XP Installation Point
To create the Office XP Installation Point, put the Office CD in the
server CD-ROM drive or a workstation CD-ROM drive and run setup.exe
/a. (You will need an Enterprise version of Office XP to
create an Administrative Installation Point) Your destination
folder will be \\servername\installs\ofcxpsp2. With Office, you cannot
just copy the contents of the CD to the server.
For more detailed information about creating an Office Administrative
Installation Point see this MS web page:
http://www.microsoft.com/office/ork/xp/one/depb01.htm
And, like the Windows XP installation point, you should slipstream
the latest Office XP service pack into your installation point.
This process is different than slipstreaming for Windows XP.
You can find information about applying Office XP SP2 to an
Office installation point at this MS web site:
http://www.microsoft.com/office/ork/xp/journ/Oxpsp2a.htm
Or at this web site here
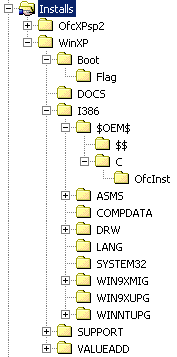
Additional Windows XP Folders
Once you have your base Installation Points created, you will add
subfolders to the D:\installs\winxp folder. Create these folders:
d:\installs\winxp\boot
d:\installs\winxp\boot\flag
Note: As part of the target PC's hard disk preparation,
a file called flag.txt will be added to and later deleted from the
d:\installs\winxp\boot\flag folder. Because of this, you will
need to add the modify permission for the user Installman,
for the d:\installs\winxp\boot\flag folder on the source server.
This will allow Installman to create and delete the flag.txt file.
The \boot folder is the folder that will be accessed when the target
PC logs in to the Domain to start the unattended install. Inside
this folder is the unattend.bat file, the unattend.txt file and files
used to partition and format the target PC hard drive. This will be
discussed later.
In addition to the boot folder, create the following folders under
d:\installs\winxp\I386:
d:\installs\winxp\I386\$OEM$
d:\installs\winxp\I386\$OEM$\$$
d:\installs\winxp\I386\$OEM$\C
d:\installs\winxp\I386\$OEM\C\OfcInst
Your directory structure should look like this. Note:
If you would like to download a .zip file that has the \$OEM$
folder and all it's files, as well as the \boot folder and
all it's files, you can
do so here.
The following table lists the \I386 subfolders that can be used by
an unattended installation and what each folder is used for. Basically,
if you need to copy any files to the target PC during an unattended
install or will be using a cmdlines.txt file, you create an $OEM$
folder and subfolders under the \I386 folder on your Windows XP installation
point. The $OEM$ folder and it's subfolders have specific purposes
which are described in the table.
For our installation scenario we will only need some of the possible
folders. Those folders and their contents will be explained
later in this document.
Note: When using the $OEM$ folder and it's subfolders to copy
files to the target PC, you have to include the OemPreinstall=Yes
line in the unattend.txt file under the [Unattended] section.
| \$OEM$ |
Holds all folders and files for an unattended
installation. Also, Cmdlines.txt, and files it references,
are put in this folder. |
| \$OEM$\Textmode |
Contains updated mass storage drivers and HAL
files required during the text-mode portion of Setup. |
| \$OEM$\$$ |
Contains files that Setup copies to the %Windir%
(e.g., C:\winnt or C:\Windows) folder during installation. |
| \$OEM$\$$\Help |
Contains custom Help files that Setup copies to
the %Windir%\Help folder during installation. |
| \$OEM$\$$\System32 |
Contains custom Help files that Setup copies to
the %Windir%\System32 folder during installation. |
| \$OEM$\$1 |
Represents the root of the drive on which you
install WinXP (usually C:\) and contains any files that Setup
should copy to the boot partition during installation. |
| \$OEM$\$1\Pnpdrvs |
Contains new or updated PnP drivers. The user
specifies the folder name in the unattend.txt file used during
unattended installations. For example, this folder might be
named \$OEM$\$1\Pnpdrvs.
|
| \$OEM$\$1\SysPrep |
Contains files that Setup uses for the Sysprep-based
method of installation. |
| \$OEM$\drive_letter |
Represents the root of a particular volume on
the system (e.g., \$OEM$\C represents the C: drive) and contains
any files that WinXP Setup should copy to this partition during
installation. |
| \$OEM$\drive_letter\subfolder |
Represents a particular subfolder of the drive
(e.g., \$OEM$\C\MyFolder) and contains any files that Setup
should copy to the subfolder during installation. Multiple instances
of this type of folder can exist under the \$OEM$\drive_letter
folder. |
The Unattend.txt
file
Below is the unattend.txt file used for this installation. I
will not go into a detailed explanation of what each heading and value
is for. Most of it is self explanatory. For a complete
description of the unattend.txt file see the Windows 2000 unattend.doc
file or the Windows XP deployment
help files.
What I have done, is added in red text,
an explanation of some of the more important values and what they
are for.
Note: This installation is using a volume license version of
Windows XP Pro which does not require activation. If you are
using a version of Windows XP that does require activation,
add the following to the unattend.txt file:
Under the [Unattended] section
AutoActivate=Yes
Under the [UserData] section, make sure you put your Product ID (serial
number)
ProductID=yourProductID
see this MS KB article for more info:
http://support.microsoft.com/default.aspx?scid=kb;[LN];Q291997
Creating an unattend.txt file
The unattend.txt file is the script file used to answer all of the
questions that are asked during a normal Windows XP installation.
It is nothing more than a simple text file that can be created
in Notepad. It doesn't have to be named unattend.txt. You
could call it winxp.txt or whatever you want. It does, however,
require a .txt extension.
Microsoft offers you some help in creating the unattend.txt file with
a utility called Setupmgr.exe.
This program can be found on the XP Pro CD under Support\Tools in
the Deploy.cab file. Setup Manager will walk you through creating
an unattend.txt file. However, it doesn't support every aspect
of unattend.txt so you might have to edit the file in Notepad after
using Setup Manager.
If necessary, you can download the XP Setup Manager here.
Note:
TechProGuild has a nice step by step how to article for the WinXP
Setup Manager.
;SetupMgrTag
[Data]
AutoPartition=1
MsDosInitiated="0"
UnattendedInstall="Yes"
[Unattended]
UnattendMode=FullUnattended
OemSkipEula=Yes
Setting OemPreInstall=Yes
is necessary if you create an $OEM$
directory under \i386 to copy files to the target PC and/or are
using a cmdlines.txt
file. If you aren't copying files to the target PC or using
a cmdlines.txt file,
then set it to No
OemPreinstall=Yes
TargetPath=\WINDOWS
The 2 lines below are used to convert the
file system to NTFS
and then extend the boot/system partition an extra 4GB.
FileSystem=ConvertNTFS
ExtendOEMPartition=4000
[GuiUnattended]
AdminPassword="happyday"
EncryptedAdminPassword=NO
OEMSkipRegional=1
TimeZone=35
OemSkipWelcome=1
The following 2 lines tell setup to login
1 time automatically after
the installation has finished. Setup will only use the local Administrator
account to login
AutoLogon=Yes
AutoLogonCount=1
[UserData]
You could add a ComputerName=
line in this section. However,
if you are installing multiple PCs, and since
each PC needs a
unique computer name, leaving out this line causes Setup to prompt
you for a computer name. Alternatively, you could use a UDF
file to provide
unique user information.
ProductID=xxxxx-xxxxx-xxxxx-xxxxx-xxxxx
FullName="Jane Doe"
OrgName="Widgets"
[Display]
BitsPerPel=32
Xresolution=1024
YResolution=768
Vrefresh=75
[Components]
This section is where you tell XP to not install
certain components.
The line below tells XP not to install MSN Explorer.
msnexplr=off
[TapiLocation]
CountryCode=1
Dialing=Tone
AreaCode=305
[RegionalSettings]
LanguageGroup=1
Language=00000409
[Branding]
BrandIEUsingUnattended=Yes
[URL]
Home_Page=www.svrops.com
[Proxy]
Proxy_Enable=0
Use_Same_Proxy=1
[Identification]
This section joins your PC to the domain indicated,
creates a computer
account and uses the username and password indicated to create the
account.
JoinDomain=MYDOMAIN.com
CreateComputerAccountInDomain=Yes
DomainAdmin=msmith
DomainAdminPassword=password
[Networking]
This section and the ones to follow were generated
by Setup Manager.
They describe what networking protocols and components to install.
InstallDefaultComponents=No
[NetAdapters]
Adapter1=params.Adapter1
[params.Adapter1]
INFID=*
[NetClients]
MS_MSClient=params.MS_MSClient
[NetServices]
MS_SERVER=params.MS_SERVER
[NetProtocols]
MS_TCPIP=params.MS_TCPIP
[params.MS_TCPIP]
DNS=Yes
UseDomainNameDevolution=No
EnableLMHosts=Yes
AdapterSections=params.MS_TCPIP.Adapter1
[params.MS_TCPIP.Adapter1]
SpecificTo=Adapter1
DHCP=Yes
WINS=No
NetBIOSOptions=0
[GuiRunOnce]
This section tells setup to run the indicated
commands at the first logon
after setup finishes. You can use Autologon in [GuiUnattended] above
to
login and automatically run these commands. For multiple commands
just
add more lines - Command1=, Command2=, etc.
Command0=c:\ofcinst\ofcxp.bat
Creating the
Network boot disk
Creating the Network boot disk that will boot your target
PC and connect it to the Windows 2000 domain could be the hardest
part of the unattended install. If you tried to do it from
scratch, you might never get it done. Microsoft, in Windows
NT Server, had a utility that would help you create a DOS bootable
disk that would connect a computer to a NT Domain, but this program
was left out of Windows 2000 Server. Not that the program
was very good to begin with. It was somewhat crude and Microsoft
never developed it after it's initial release.
Luckily, I can provide you with a floppy
disk image from which you can create the network boot disk.
The image file is self extracting and will create a disk that will
boot the PC using DOS 6.22, connect to a Windows NT or 2000 domain,
login, and map a drive to a share on the source server. The
disk has support for 3COM's 3c90x line of network adapters, and
changing or adding network card support is an easy process using
a batch file. Read the Readme.txt on the floppy for instructions.
Another possibility, if you have access to Ghost Enterprise
or Ghost 2003, is to use Ghost to create a network boot disk. Ghost
makes the process very easy and supports many network cards.
The network boot disk, for this installation scenario, does 3
things. It connects the PC to a domain, maps a drive to
a share on the source server and starts the unattended install.
Nothing else is done on the floppy.
Note: Once XP setup starts copying files to your target PC's
hard drive, remove the network boot disk from the PC. It
will no longer be needed.
The rest of this unattended installation is done from the Win2000
server. That is what we will be talking about next.
The autoexec.bat file on the Network Boot Disk:
@echo off
:: This file first checks to see if you want to change your Protocol.ini
and
:: System.ini files before you connect to the domain. If you
do, then it calls
:: netcard.bat to change these files then returns to this file to
connect
:: to the network. Make sure you copy your DOS network card
driver to a:\net
:: first, if you are going to change the .ini files.
cls
path=a:\;a:\net
echo.
echo.
echo **
Change Ini Files? **
echo.
echo Do you need to modify the Protocol.ini and System.ini
files? [Y/N]
echo.
a:\yn.com
if not errorlevel 1 goto START
if errorlevel 1 if not errorlevel 0 goto INIFILES
:INIFILES
@call a:\netcard.bat
goto START
:START
cls
a:\net\smartdrv.exe /q
a:\net\net initialize
a:\net\netbind.com
a:\net\umb.com
a:\net\tcptsr.exe
a:\net\tinyrfc.exe
a:\net\nmtsr.exe
a:\net\emsbfr.exe
a:\net\net start
:: The following lines can be deleted or modified to suit your needs.
:: They can be used to map a drive to a server and start an unattended
install.
:: Note: You can only map a drive to the root of a share when using
DOS. DOS
:: doesn't support deep redirection so you can't map to a folder
under
:: a share, e.g. \\srv2k01\installs is the share. You can't
map to \\srv2k01\installs\winxp.
net use I: \\SRV2K01\Installs
@echo off
::Check to see if the drive exists
if not exist I:\winxp\*.* goto NODRIVE
:: Start the unattended install with unattend.bat
I:
cd\
cd winxp\boot
unattend.bat
:NODRIVE
cls
echo.
echo The mapped drive - I: was not found. Please try
echo remapping the drive or reboot the PC and try again.
goto end
:END
a:
cd\
Preparing the
Target PC
Earlier, when you were creating your Windows XP Pro installation
point, you created a winxp\boot folder. This folder is what
the network boot disk will connect the target PC to. In this
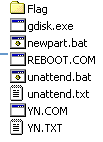
folder are the following files and folder:
Note: If you would like to download a .zip file that has
the \$OEM$ folder and all it's files, as well as the \boot
folder and all it's files, you can do so here.
Once you are connected to the d:\installs\winxp\boot directory,
the unattend.bat file (below) is run. Unattend.bat calls newpart.bat
which uses gdisk.exe to partition and format the hard
drive. Gdisk.exe is a souped up version of the DOS Fdisk utility.
It is made by Symantec and comes with Norton Ghost.
After the hard drive is partitioned and formatted (FAT16), the PC
must be rebooted. This is done by calling reboot.com.
The target PC reboots, and again connects to the source server
and looks for the flag.txt file in the \boot\flag directory. If
this file is found, then the PC's hard drive has been formatted
and the batch program jumps down to start the Windows XP Pro install
using unattend.txt.
The yn.com file is a simple file that waits for you to press
Y or N. It uses an errorlevel to check which was pressed.
See the YN.txt file for info.
The unattend.bat file:
@echo off
::Batch file to kick off XP Pro Unattended Install
::The I: Drive, which is used below, is created on the
::floppy disk that connects the PC to the server
::with the net use command, eg. net use i: \\server01\installs.
::Once the WinXP Pro install starts copying files, you can
::remove the floppy disk from the PC.
cls
:: Set environmental variables
set AnswerFile=i:\winxp\boot\unattend.txt
set SetupFiles=i:\winxp\i386
:: After Gdisk partitions and formats the hard drive the PC must
be
:: rebooted. The following line checks to see if the PC was rebooted
:: by checking for the flag.txt file.
:: If the file exists, the PC was formatted and partitioned, and
the
:: batch files jumps down to install WinXP.
if exist flag\flag.txt goto INSTALL
echo.
echo Your PC is connected to the Network, and
echo Windows XP Pro Setup will begin.
echo.
echo Your Hard Drive will be partitioned and
echo formatted.
echo.
echo Do you want to continue (Y/N)?
echo.
yn.com
if not errorlevel 1 goto STOP
goto PART
:PART
:: Call Norton Gdisk.exe to partition and format the hard drive,
then reboot the PC.
@call newpart.bat
:: This line creates the flag.txt file. If the flag.txt file
:: exists in the \Flag directory, then the PC was partitioned and
formatted.
echo Gdisk was Run > flag\flag.txt
:: Reboot.com is a small program that reboots a PC
reboot.com
goto END
:INSTALL
If exist flag\flag.txt del flag\flag.txt
::Start the WinXP Pro Install
I:
cd\
winxp\i386\winnt.exe /u:%AnswerFile% /s:%SetupFiles%
goto END
:STOP
cls
echo.
echo User Terminated Install
echo.
goto END
:END
The XP Pro
Installation Starts
The target PC's hard drive has been partitioned, formatted and XP
Pro is being installed. XP setup will format the hard drive
as NTFS and extend the partition to 6GB. You will
be asked to enter a unique computer name at the beginning of the
XP install, and the computer will be added to the network. As
part of the XP Pro unattended install, the files and/or directories
under the d:\installs\winxp\I386\$OEM$ folder on the source
server will be copied to the target PC hard drive. A file,
shutdown.exe, which is in the d:\installs\winxp\I386\$OEM$\$$ folder
on the source server, will be copied to C:\windows. The directory,
Ofcinst and it's files, which is in the d:\installs\winxp\I386\$OEM$\C
folder on the source server, will be copied to the root of C:\.
About 20 mins. later, the install will finish on it's own and the
target PC will be rebooted. At this point, the XP Pro installation
is completed on the target PC. The rest of the unattended
install is for customizing the target PC after XP Pro has been installed.
After the PC reboots, the local Administrator user will automatically
login, and the final phase of the unattended install will start.
Run the
ofcxp.bat file in GuiRunOnce
Once the Administrator logs in, a batch file, ofcxp.bat, which
is in the c:\ofcinst folder, will kick off and finish the install.
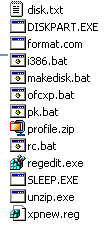
The c:\ofcinst folder on the target PC contains the following
files:
It is worth mentioning here that instead of calling a batch file
from GuiRunOnce, you could use the cmdlines.txt file
to do many of the same things. Cmdlines.txt is just a text
file you can make in Notepad with a line for each action you want
run (I included a sample cmdlines.txt in the $OEM$ directory
download). Cmdlines.txt is called at the end of setup and
before the PC reboots for the last time. You put cmdlines.txt
in the I386\$OEM$ directory of your installation point along with
any files that cmdlines will be calling or referencing.
The only drawback to using cmdlines is you can't see what
is happening as the commands are run. If there is a problem, it
is more difficult to ascertain the source of the problem. Also,
I had problems modifying the registry and installing Office using
cmdlines.txt (they just didn't work right), and that is one reason
I chose not to use it. It might be different for you, so it
is worth testing if you would rather use it.
The ofcxp.bat file does the following:
| 1. Modify some registry settings
on the target PC. |
| This is done by the xpnew.reg file |
| 2. Copy the Windows XP I386
directory from the source server to the C:\I386 directory on
the target PC. |
The d:\installs\winxp\I386\ files and folders on the source
server are copied to the c:\I386 folder on the target PC by
the i386.bat file. This file copies the files then checks
for success.
Note: The I386 folder on the source server also has the
$OEM$ folder in it which isn't needed on the target PC. The
$OEM$ folder, in c:\I386, is deleted after all the files and
folders are copied. |
| 3. Create and format as NTFS,
a second partition which will be the E: drive. The C: drive
will be the boot/system partition, and D: will be the CD ROM
drive. |
This is done by calling makedisk.bat. The makedisk.bat
file uses the Microsoft Diskpart utility. Diskpart
can create partitions from within Windows. It is essentially
an automated Disk Manager. The file disk.txt has
the commands that Diskpart.exe will use to create the new partition.
A new partition - E: will be created and the remaining
drive space will be used for the E: drive.
Once Diskpart creates the partition, the WinXP Format.com
program formats the partition as NTFS. |
| 4. Install Office XP on the
E: drive under E:\Program Files. |
| Now that the E: drive has been created, an E:\Program Files
directory is created and the automated install for Office XP
is started. This is done with a standard Office install
command using a MST file to configure the Office installation.
You can get more information on Office XP deployment at
this MS
web site. |
| 5. Delete the Default User
profile and copy a preconfigured Default User profile to the
target PC. |
The reason for this step is to create a default user environment
for each user that logs on to the PC. If you set up a
reference PC to test your unattended install on, you can create
a local account called Testuser, login as Testuser, configure
the Desktop, Internet Explorer settings, Windows Explorer settings,
Display settings and so on. These settings, which are saved
in the Testuser's profile, can be copied to other users by copying
the Testuser profile to the Default User profile. Then,
each time a new user logs in for the first time, they will get
those settings from the Default User profile.
For this install, once I configured my Testuser's settings and
copied the Testuser profile to the Default User profile, I used
a zip utility, Winzip, and zipped up the Default User profile
directory. I then copied that .zip file to the source
server. During the unattended install of XP, that .zip
file, profile.zip, gets copied to the target PC's hard
drive under C:\ofcinst. In the ofcxp.bat file, PK.bat
gets called and deletes the Default User directory and subdirectories
on the target PC. Then, using an unzip program, unzip.exe,
that will run in an XP command prompt window, it unzips the
profile.zip file and the Default User directory and subdirectories
get created.
|
| 6. Do a silent install of Recovery
Console. |
This is fairly straight forward. Since the XP I386 directory
has been copied to the target PC (see step 2 above), you can
install Recovery Console by issuing the command:
c:\i386\winnt32.exe /cmdcons /unattend. The /unattend
switch allows Recovery Console to install without prompting
you with the usual questions.
The RC.bat file, in C:\ofcinst, installs Recovery Console. |
| 7. Reboot the PC for a final time.
User logs in. |
Finally, we are through with the Windows XP install. It
is time to reboot the PC. You can do this with the MS
Shutdown.exe utility. During the unattended install, shutdown.exe
was copied to C:\windows. It is called from the ofcxp.bat
file.
Note: Although Shutdown.exe was copied to the target
PC from the source server, this was done to show how you would
copy a file to the system root folder. However, it really
isn't necessary to copy this file since Windows XP Pro comes
with Shutdown.exe in the Windows\system32 folder.
|
8. Oh wait...There is one last
thing to do. Now that the install is finished, we
no longer need the C:\ofcinst folder and it's files. The
very last thing to do is delete this folder. This is done with
the commands:
cd\
Start /b %ComSpec% /cRD /s /q "%~dp0" |
The ofcxp.bat file:
@echo off
c:
cd\
:: Create folders on target PC
if not exist c:\logfiles\CON md Logfiles
if not exist c:\i386\CON md I386
if not exist c:\Logfiles\CON goto END
if not exist c:\I386\CON goto END
cd\
:: Create an authenticated connection to the server by mapping a
drive.
net use q: \\srv2k01\installs /user:arbor01\installman /persistent:no
catfish
:: Changes some registry settings
cd ofcinst
start /wait regedit /s xpnew.reg > c:\logfiles\xpnew.txt
:: Copy the i386 files to c:\I386 on the target PC
start /wait i386.bat
:: Create E: Drive on the target PC
c:
cd\
cd ofcinst
start /wait makedisk.bat
if not exist e:\CON goto BADRIVE
if exist e:\CON md "e:\Program Files"
if not exist "e:\Program Files" goto END
:: Start the automated install of Office XP.
start /wait \\srv2k01\installs\OfcXPsp2\setup.exe TRANSFORMS="\\srv2k01\Installs\OfcXPsp2\OffXP2e.MST"
/qb /lew c:\logfiles\officexp.txt
:: Recreate the default user profile on the target PC
start /wait pk.bat
:: Install Recovery Console on the target PC
echo.
echo Installing Recovery Console...
start /wait rc.bat
echo.
if not exist c:\cmdcons\CON echo Recovery Console Not Installed.
if exist c:\cmdcons\CON echo Recovery Console Installed.
:: Reboot the PC using the Shutdown program located in the c:\windows
folder.
start /wait %windir%\shutdown.exe /L /T:4 "Computer will now
Reboot" /C /R /Y
goto EXIT
:END
echo Folder(s) not created.
echo Office XP was not installed.
goto STOP
:BADRIVE
echo E: drive does not exist
goto STOP
:EXIT
:: The following lines delete this file and the directory it's in.
cd\
Start /b %ComSpec% /cRD /s /q "%~dp0"
exit
:STOP
pause
Final Thoughts
Creating and testing a Windows unattended install can be time
consuming and frustrating, depending on how complex you try
to make it. There is no definitive document/book/web site
that outlines how to create a Windows unattended install. Information
and documentation for unattended installs is piecemeal and
scattered all over the place. Even Microsoft's own documentation
on unattended installs is like this. You will have to read
books, search web sites, experiment, and ask questions.
Also, there is no definitive way of implementing an unattended install
because every environment is different. If you plan on adding
multiple applications to your automated installation, an unattended
install might not be the best idea. Disk imaging might be a better
choice.
Disk imaging software has matured in the last couple of years,
and creating an image of a reference PC and deploying that image
is probably the fastest way to set up PCs. Using Sysprep with
the Disk Image allows for some variety in your PC hardware, however;
the more homogenous your hardware environment, the better off you
will be (standardization is key).
There are also specialized 3rd party tools that can be used for
operating systems deployment, but these tools tend to be rather
expensive.
Whatever your choice for operating systems deployment, unattended
installs are still, and will be for the near future, a viable way
of deploying Microsoft operating systems.
Hopefully this document gave you some ideas and direction in creating
an unattended install of Windows XP with Office XP.
|